
Starting The Project
Download Sample project from :-
Download: https://github.com/litto/Laravel5--Sample-Project--Including-CRUD-Functions
In this blog Iam going to explain a Sample project with all functions that is needed like Creating, Updating, Deletion,File Uploading, Routing, Session management.etc.. Hope you hav installed laravel project as I explained in my previous post. If not read it :-
http://phpdudes.blogspot.ae/2016/10/laravel-5-installation-steps-for.html
Creating a Database
1) First Create a db of your preffered name,Iam naming it as Laravel.
2 create tables cms, admin, cms_userauth.
3) cms_admin contain fields like auth_id,username, password.
4) cms_userauth contain fields like user_id,name,email,password
Connecting DB to the project
1) Find a file name .env in the root folder of your project
2) Find the lines
DB_CONNECTION=mysql
DB_HOST=127.0.0.1
DB_PORT=3306
DB_DATABASE=newlaravel
DB_USERNAME=root
DB_PASSWORD=
3) Give values for each variables.
4) Your db connection has been established
Folder Structure
This will be your project folder structure :-

I will explain you, purpose of each folder one by one
app − This directory contains the core code of the application.
bootstrap − This directory contains the application bootstrapping script.
config − This directory contains configuration files of application.
database − This folder contains your database migration and seeds.
public − This is the application’s document root. It starts the Laravel application. It also contains the assets of the application like JavaScript, CSS, Images, etc.
resources − This directory contains raw assets such as the LESS & Sass files, localization and language files, and Templates that are rendered as HTML.
storage − This directory contains App storage, like file uploads etc. Framework storage (cache), and application-generated logs.
test − This directory contains various test cases.
vendor − This directory contains composer dependencies.
Start The Project
Routing
Now the important Feature of our project is Routing. It is like explaining which controller & function each url should use.
So, you can find the route configuration file in /app/Http/ folder. Here opne the file named routes.php.
In my I have already defined my routes:-
For eg:
Route::get('/index', array('as' => 'index', 'uses' => 'AdminController@index'));
This means If a request comes like: http://localhost:8000/index . Then this route condition will triggered.
It will use AdminController & function index defined in the controller.
Route::get('/list', array('as' => 'list', 'uses' => 'UserController@index'));
Here If request like http://localhost:8000/list comes then it will use UserController & Function index defined in it.
Now may be you are wondering what is this Controllers & functions & all. I will explaain in the coming portions.
So see another Route line like this:
Route::get('edit/{id}','UserController@edit');
This is for urls like : http://localhost:8000/edit/7
Here the Id will be passed as variable to the Function
Defining Controllers & Views
We will define controllers in the folder /app/ Http/Controllers/
Here For eg: If you need to create a Controller for User table. Create controller with name: UserController.php
You can see in My project UserController.php
In it I will explain one Function:-
Lets take index function defined their:-
public function index(){
$users = DB::table('cms_userauth')->get();
return view('user_list',['users'=>$users]);
}
Here the database functions I will explain later, see the line
return view('user_list',['users'=>$users]);
Here when route calls this Controller & function, what it is doing is that, it will fetch all user details & it is returing a view file named user_list & its passing an array to that file.
Defining Views
In previous Function it is calling a view file right? Actually It is the view for users.
This is defined in /resources/views/ folder.
Here in my project you can see user_list.blade.php
This File willl be displayed.. For knowing about why blade.php extension comes. Actually It is a laravel templating function. For more details about blade template check in Laravel Site.
Installing Html Package
Laravel provides various in built tags to handle HTML forms easily and securely. All the major elements of HTML are generated using Laravel. To support this, we need to add HTML package to Laravel using composer.
Step 1 − Execute the following command to proceed with the same.
composer require illuminate/html
Now, we need to add this package to Laravel configuration file which is stored at config/app.php. Open this file and you will see a list of Laravel service providers as shown in the following image.

Step 4 − Add aliases in the same file for HTML and Form. Notice the two lines indicated in the outlined box in the following image and add those two lines.

But there is a bug in this package, I dont know why it is like that. But you can solve taht issue like :-
Navigate to vendors/illuminate/html/HtmlServiceProvider.php
Here change the lines 36 & 49.
$this->app->bindShared('html', function($app) to $this->app->singleton('html', function($app)
$this->app->bindShared('form', function($app) to $this->app->singleton('form', function($app)


Now Package problem will be solved
Including Css in Views
Now using this Html package templating the method of including css is slightly different. Place your css inside public folder in root.
create a folder named css & include all your css files their.
Now include it in your view file like this:-
{!! HTML::style('css/bootstrap.min.css') !!}
Here boostrap.min.css is placed inside css folder
Including Js File in Views
Now using this Html package templating the method of including Js is slightly different. Place your Js inside public folder in root.
create a folder named Js & include all your Js files their.
Now include js file like this:-
{!! HTML::script('js/bootstrap-datepicker.js') !!}
Here js/bootstrap-datepicker.js is placed in the js folder in public.
Including header/ footer Files in Your Views
So In your project mostly we have to include same files in view files like header, footer, menu.etc.. So in Laravel the method is slighly different.
For eg: you have header.blade.php, footer.blade.php & user_list.blade.php in your views folder.
Then to include header & footer in the user_list.blade.php file, You just code like this:-
@include('header')
---------code here------------
@include('footer')
For more clarity check my project included in this post.

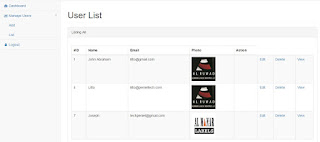
Displaying Records in View
So In our Controller , index function we passed a array named users to user_list view right?
So we are displaying in the view like this:-
@foreach ($users as $user)
{{ $user->user_id }} //id displayed
{{ $user->email }} // mail will be displayed
@endforeach
Creating Forms
Open forms like this
<?php echo Form::open(array('url' => '/createsubmit','files'=>'true')); ?>
as we have installed Html package, it will defaulty provide form functions like this:-
Just refer in my project folder & look into each file you will understand clearly.
Create Records in DB (with File Uploading)
While defining Create Submit Form Function dont forget to pass a request parameter in the function definition:-
public function createsubmit(Request $request){
$name = $request->input('name');
$email = $request->input('email');
$file = $request->file('userfile');
$destinationPath = 'uploads';
$file->move($destinationPath,$file->getClientOriginalName());
$imagename= $file->getClientOriginalName();
if($imagename==''){
$imagename='user.png';
}
DB::table('cms_userauth')->insert(
array('name' =>$name, 'email' => $email,'photo'=>$imagename,'status'=>1)
);
echo "Record inserted successfully.<br/>";
return redirect('list');
}
Here we can get value of each variable submitted using:-
$request->input('variable name'); this function
Image will be uploaded to our defined destination like:-
$file->move($destinationPath,$file->getClientOriginalName());
This will upload to the folder uploads we created in public folder..
File can be viewed by:- <image height="100px" width="100px" src="/uploads/{{ $user->photo }}"/>
Then data is inserted in the table cms_userauth as:-
DB::table('cms_userauth')->insert(
array('name' =>$name, 'email' => $email,'photo'=>$imagename,'status'=>1)
);

Updating Data in DB
DB::table('cms_userauth')->where('user_id',$id)->update(array('name' =>$name, 'email' => $email,'photo'=>$imagename));

Fetching Single Record
$users = DB::table('cms_userauth')->where('user_id', '=', $id)->get();
Fetching all records
$users = DB::table('cms_userauth')->get();
Fetching records with Condition
$users = DB::table('cms_userauth')
->where('votes', '>', 100)
->orWhere('name', 'John')
->get();
Deleting records
DB::table('cms_userauth')->where('user_id', '=', $id)->delete();
For more Information on DB Queries ..please refer:- https://laravel.com/docs/4.2/queries
Redirecting to another view
For redirecting to one function from other
return redirect('index');
Sessions in Laravel
For setting a session variable, save like this:
$request->session()->put('loginadminname', $users[0]->username);
For getting all sessions
$data = $request->session()->all();
For deleting all session variables:-
$request->session()->flush();
Now I think u got a little idea about laravel... So for more clarification download my project & go through this post..
Download: https://github.com/litto/Laravel5--Sample-Project--Including-CRUD-Functions
Download Sample project from :-
Download: https://github.com/litto/Laravel5--Sample-Project--Including-CRUD-Functions
In this blog Iam going to explain a Sample project with all functions that is needed like Creating, Updating, Deletion,File Uploading, Routing, Session management.etc.. Hope you hav installed laravel project as I explained in my previous post. If not read it :-
http://phpdudes.blogspot.ae/2016/10/laravel-5-installation-steps-for.html
Creating a Database
1) First Create a db of your preffered name,Iam naming it as Laravel.
2 create tables cms, admin, cms_userauth.
3) cms_admin contain fields like auth_id,username, password.
4) cms_userauth contain fields like user_id,name,email,password
Connecting DB to the project
1) Find a file name .env in the root folder of your project
2) Find the lines
DB_CONNECTION=mysql
DB_HOST=127.0.0.1
DB_PORT=3306
DB_DATABASE=newlaravel
DB_USERNAME=root
DB_PASSWORD=
3) Give values for each variables.
4) Your db connection has been established
Folder Structure
This will be your project folder structure :-

I will explain you, purpose of each folder one by one
app − This directory contains the core code of the application.
bootstrap − This directory contains the application bootstrapping script.
config − This directory contains configuration files of application.
database − This folder contains your database migration and seeds.
public − This is the application’s document root. It starts the Laravel application. It also contains the assets of the application like JavaScript, CSS, Images, etc.
resources − This directory contains raw assets such as the LESS & Sass files, localization and language files, and Templates that are rendered as HTML.
storage − This directory contains App storage, like file uploads etc. Framework storage (cache), and application-generated logs.
test − This directory contains various test cases.
vendor − This directory contains composer dependencies.
Start The Project
Routing
Now the important Feature of our project is Routing. It is like explaining which controller & function each url should use.
So, you can find the route configuration file in /app/Http/ folder. Here opne the file named routes.php.
In my I have already defined my routes:-
For eg:
Route::get('/index', array('as' => 'index', 'uses' => 'AdminController@index'));
This means If a request comes like: http://localhost:8000/index . Then this route condition will triggered.
It will use AdminController & function index defined in the controller.
Route::get('/list', array('as' => 'list', 'uses' => 'UserController@index'));
Here If request like http://localhost:8000/list comes then it will use UserController & Function index defined in it.
Now may be you are wondering what is this Controllers & functions & all. I will explaain in the coming portions.
So see another Route line like this:
Route::get('edit/{id}','UserController@edit');
This is for urls like : http://localhost:8000/edit/7
Here the Id will be passed as variable to the Function
Defining Controllers & Views
We will define controllers in the folder /app/ Http/Controllers/
Here For eg: If you need to create a Controller for User table. Create controller with name: UserController.php
You can see in My project UserController.php
In it I will explain one Function:-
Lets take index function defined their:-
public function index(){
$users = DB::table('cms_userauth')->get();
return view('user_list',['users'=>$users]);
}
Here the database functions I will explain later, see the line
return view('user_list',['users'=>$users]);
Here when route calls this Controller & function, what it is doing is that, it will fetch all user details & it is returing a view file named user_list & its passing an array to that file.
Defining Views
In previous Function it is calling a view file right? Actually It is the view for users.
This is defined in /resources/views/ folder.
Here in my project you can see user_list.blade.php
This File willl be displayed.. For knowing about why blade.php extension comes. Actually It is a laravel templating function. For more details about blade template check in Laravel Site.
Installing Html Package
Laravel provides various in built tags to handle HTML forms easily and securely. All the major elements of HTML are generated using Laravel. To support this, we need to add HTML package to Laravel using composer.
Step 1 − Execute the following command to proceed with the same.
composer require illuminate/html
Now, we need to add this package to Laravel configuration file which is stored at config/app.php. Open this file and you will see a list of Laravel service providers as shown in the following image.

Step 4 − Add aliases in the same file for HTML and Form. Notice the two lines indicated in the outlined box in the following image and add those two lines.

But there is a bug in this package, I dont know why it is like that. But you can solve taht issue like :-
Navigate to vendors/illuminate/html/HtmlServiceProvider.php
Here change the lines 36 & 49.
$this->app->bindShared('html', function($app) to $this->app->singleton('html', function($app)
$this->app->bindShared('form', function($app) to $this->app->singleton('form', function($app)

Changed File will be like this:-

Now Package problem will be solved
Including Css in Views
Now using this Html package templating the method of including css is slightly different. Place your css inside public folder in root.
create a folder named css & include all your css files their.
Now include it in your view file like this:-
{!! HTML::style('css/bootstrap.min.css') !!}
Here boostrap.min.css is placed inside css folder
Including Js File in Views
Now using this Html package templating the method of including Js is slightly different. Place your Js inside public folder in root.
create a folder named Js & include all your Js files their.
Now include js file like this:-
{!! HTML::script('js/bootstrap-datepicker.js') !!}
Here js/bootstrap-datepicker.js is placed in the js folder in public.
Including header/ footer Files in Your Views
So In your project mostly we have to include same files in view files like header, footer, menu.etc.. So in Laravel the method is slighly different.
For eg: you have header.blade.php, footer.blade.php & user_list.blade.php in your views folder.
Then to include header & footer in the user_list.blade.php file, You just code like this:-
@include('header')
---------code here------------
@include('footer')
For more clarity check my project included in this post.

Displaying Records in View
So In our Controller , index function we passed a array named users to user_list view right?
So we are displaying in the view like this:-
@foreach ($users as $user)
{{ $user->user_id }} //id displayed
{{ $user->email }} // mail will be displayed
@endforeach

Creating Forms
Open forms like this
<?php echo Form::open(array('url' => '/createsubmit','files'=>'true')); ?>
as we have installed Html package, it will defaulty provide form functions like this:-
Just refer in my project folder & look into each file you will understand clearly.
Create Records in DB (with File Uploading)
While defining Create Submit Form Function dont forget to pass a request parameter in the function definition:-
public function createsubmit(Request $request){
$name = $request->input('name');
$email = $request->input('email');
$file = $request->file('userfile');
$destinationPath = 'uploads';
$file->move($destinationPath,$file->getClientOriginalName());
$imagename= $file->getClientOriginalName();
if($imagename==''){
$imagename='user.png';
}
DB::table('cms_userauth')->insert(
array('name' =>$name, 'email' => $email,'photo'=>$imagename,'status'=>1)
);
echo "Record inserted successfully.<br/>";
return redirect('list');
}
Here we can get value of each variable submitted using:-
$request->input('variable name'); this function
Image will be uploaded to our defined destination like:-
$file->move($destinationPath,$file->getClientOriginalName());
This will upload to the folder uploads we created in public folder..
File can be viewed by:- <image height="100px" width="100px" src="/uploads/{{ $user->photo }}"/>
Then data is inserted in the table cms_userauth as:-
DB::table('cms_userauth')->insert(
array('name' =>$name, 'email' => $email,'photo'=>$imagename,'status'=>1)
);

Updating Data in DB
DB::table('cms_userauth')->where('user_id',$id)->update(array('name' =>$name, 'email' => $email,'photo'=>$imagename));

Fetching Single Record
$users = DB::table('cms_userauth')->where('user_id', '=', $id)->get();
Fetching all records
$users = DB::table('cms_userauth')->get();
Fetching records with Condition
$users = DB::table('cms_userauth')
->where('votes', '>', 100)
->orWhere('name', 'John')
->get();
Deleting records
DB::table('cms_userauth')->where('user_id', '=', $id)->delete();
For more Information on DB Queries ..please refer:- https://laravel.com/docs/4.2/queries
Redirecting to another view
For redirecting to one function from other
return redirect('index');
Sessions in Laravel
For setting a session variable, save like this:
$request->session()->put('loginadminname', $users[0]->username);
For getting all sessions
$data = $request->session()->all();
For deleting all session variables:-
$request->session()->flush();
Now I think u got a little idea about laravel... So for more clarification download my project & go through this post..
Download: https://github.com/litto/Laravel5--Sample-Project--Including-CRUD-Functions
I strongly agree with you. Your information is very informative and your website is very user friendly. I am a developer and I am getting help from your website and would recommend other to use your site. We also provide range of website development tools. Here is the link of our website jsononline
ReplyDeleteThank you for sharing this informative post. Looking forward to read more.
ReplyDeleteLaravel Web Development Services
Thank you for sharing this informative post. Looking forward to reading more.
ReplyDeleteLaravel Development Services